System - Deal with NVIDIA Graphic Card & Ubuntu 16.10
Preface
At leboncoin, we’re using Lenovo Thinkpad T460p laptop with a serious hardware config (Intel Core i7 vPro, 16Go RAM, Dual GFX Intel/Nvidia & SSD) which is comfy for our daily tasks.
But last week, some artefacts appeared (black pixels blinking) on my screen (finally due to a bad cable…) and I also noticed that I was only using the Intel card and never the other one (Nvidia).
So I decided to setup the Nvidia graphic card and install drivers and tools as Bumblebee for example.
Obviously, the Internets has a lot of informations about setup, etc, but I faced some troubles to setup it on Ubuntu 16.10.
This quick guide is a sum up of all of my researches and provide a working method.
Based on Nvidia GM108M [GeForce 940MX] and Ubuntu 16.10.
Graphic Card setup
Add PPA repository
$ sudo add-apt-repository ppa:graphics-drivers/ppa
$ sudo apt update
Install the latest version
Currently, the version 375 is the most stable, but feel free to use a newer one
$ sudo apt-get install nvidia-375 nvidia-opencl-icd-375 nvidia-common
  nvidia-prime nvidia-settings
Activate the driver
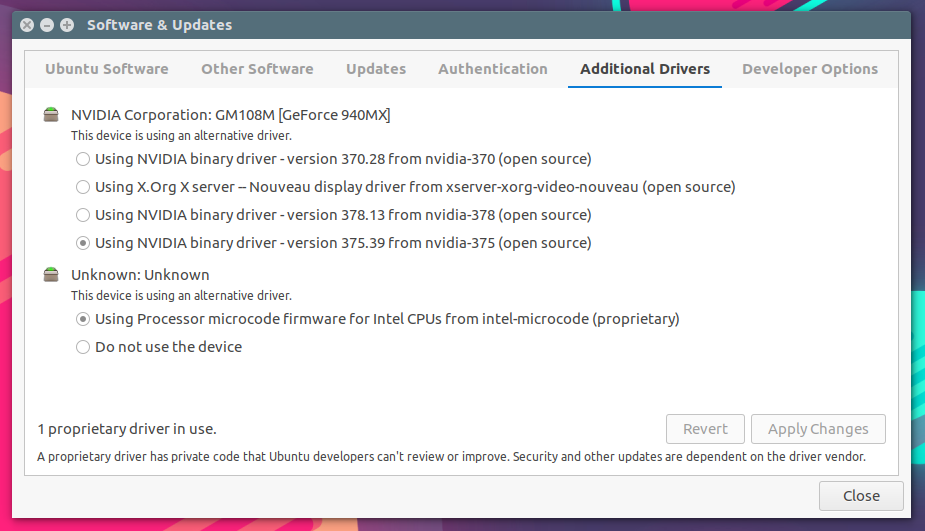
From System Settings or directly from the menu / Dash, open Software & Updates, click on the Additional Drivers tab, select the driver you want to use, and click “Apply changes”

(Opt) Disable Power Management
This step is mandatory if:
Kernel >=4.8, with a system for which the nvidia card is not the primary output and a BIOS released >=2015.
Currently, there’s a bug with Nvidia graphic cards and Kernel >= 4.8 and the workaround consists to disable the Power Management for PCI Express cards in GRUB
Add the kernel option
Add pcie_port_pm=off kernel option on GRUB_CMDLINE_LINUX_DEFAULT line in /etc/default/grub
[...]

GRUB_DEFAULT=0
GRUB_HIDDEN_TIMEOUT=0
GRUB_HIDDEN_TIMEOUT_QUIET=true
GRUB_TIMEOUT=10
GRUB_DISTRIBUTOR=`lsb_release -i -s 2> /dev/null || echo Debian`
GRUB_CMDLINE_LINUX_DEFAULT="quiet splash pcie_port_pm=off"
GRUB_CMDLINE_LINUX=""

[...]
Update GRUB
$ sudo update-grub
If interested, issues are opened for Nvidia and Bumblebee
Verify !
Once done, restart your system !
To ensure your Nvidia card is correctly installed, you can try these commands:
-
dmesg
$ dmesg | egrep -ni "bbswitch|nvidia" -
nvidia-setup
$ nvidia-setupAnd verify informations about your graphic card (GPU 0).
-
glxinfo
$ glxinfo|egrep "OpenGL vendor|OpenGL renderer"
Power Saving
Set Intel card as default
To avoid black screen login, set the intel card as default:
$ sudo prime-select intel
Install Bumblebee
Bumblebee is available in Ubuntu default repository
$ sudo apt install bumblebee
Blacklist your driver
Open /etc/modprobe.d/bumblebee.conf with a text editor (as root) and add your driver a the end of file:
# 375
blacklist nvidia-375
blacklist nvidia-375-updates
blacklist nvidia-experimental-375
Note: If you install some newer Nvidia graphics drivers (nvidia-378, etc.), you’ll need to add them too in the same way.
Configure Bumblebee
Open /etc/bumblebee/bumblebee.conf and modify some parts:
- In
bumblebeedmarker[bumblebeed] Driver=nvidia - In
driver-nvidiamarker[driver-nvidia] KernelDriver=nvidia-375 LibraryPath=/usr/lib/nvidia-375:/usr/lib32/nvidia-375 XorgModulePath=/usr/lib/nvidia-375/xorg,/usr/lib/xorg/modules
Note: Same as above, if you install a newer drivers, don’t forget to update paths with the correct version number`
Upgrade XORG
- Find the bus ID for the Nvidia graphic card
$ lspci | egrep 'VGA|3D' - Uncomment and modify the
busIDparameter in/etc/bumblebee/xorg.conf.nvidiaBusID "PCI:02:00.0"
Reboot
That’s all !
After rebooting, you can verify the state of you graphic card with:
$ cat /proc/acpi/bbswitch
To launch an application with Nvidia:
optirun <application>
